Outlook emails hold business-critical data which needs a safety net from data loss. Microsoft (Office) 365 offers some native archival options to protect them. In this blog, we examine one such native way to archive Outlook emails using the Office 365 archive policy.
There are two ways to configure Office 365 archive mailboxes: using the graphical interface at the Office 365 Admin Center or by using Microsoft PowerShell. Additionally, PowerShell allows us to enable archive mailboxes for all users in the organization. Note: You need to have the Mail Recipients role in Exchange Online to configure Archive mailboxes. Need to configure retention policies instead? Read Part 2: How to setup Office 365 Retention Policy.
Native Microsoft Backup: How To Archive Outlook Emails Using Office 365 Archive Policy?
Understanding Archive Mailboxes in Office 365
An archive mailbox in Office 365 is essentially an additional storage compartment designed to enhance email data management. By providing extra space, it allows users to manage their email effectively without worrying about overloading their primary mailbox.
Enhanced Storage Solution
Optimize Primary Inbox: With an archive mailbox, you can transfer older emails, documents, and images out of your main inbox. This keeps your primary storage area clear for incoming messages and important current data, ensuring your system runs efficiently.
Seamless Data Retention: Organizations bound by compliance requirements or internal policies can store specific email data for predefined periods. Archive mailboxes support these needs by keeping historical data accessible yet organized, mitigating potential risks related to data loss or non-compliance.
Advantages of Using Archive Mailboxes
Streamlined Email Management: By moving less frequently accessed items to the archive, you reduce clutter, making it easier to locate and manage current, pertinent emails.
Server Performance: Freeing up space in the primary storage alleviates pressure on the email server, leading to improved overall system performance and reliability.
Scalable Storage: Archive mailboxes can be expanded as needed, offering a flexible and scalable solution to growing data storage requirements without the need for additional hardware investments.
In summary, utilizing archive mailboxes in Office 365 not only facilitates effective email data handling but also ensures adherence to compliance needs, all while optimizing system performance.
Method 1: Enable Microsoft 365 Archive Mailbox Via The Compliance Center
Watch the video here or follow the step-wise instructions below
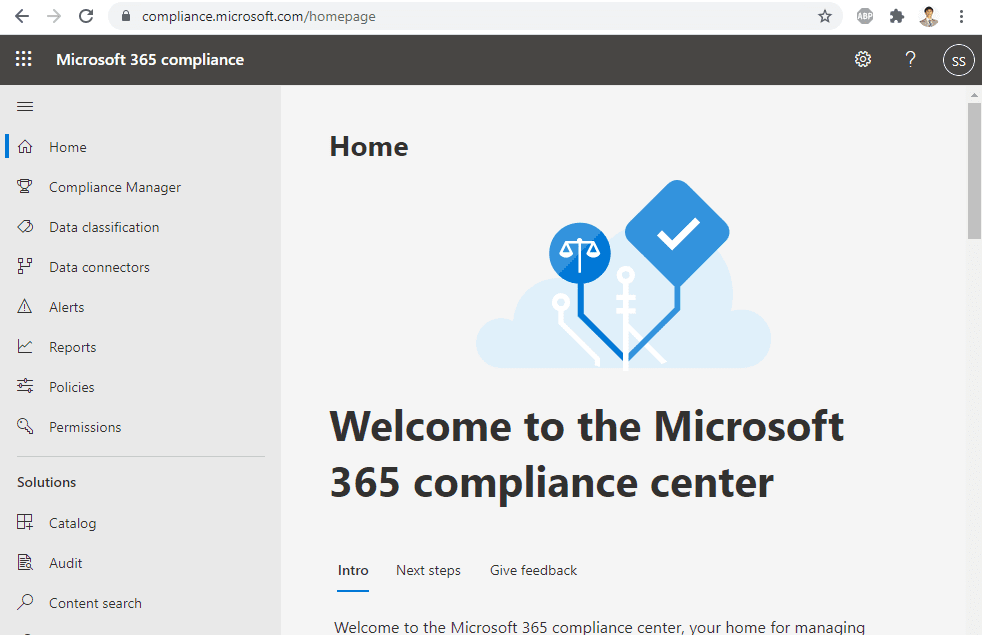
Step 1: Open the Office 365 Compliance Center
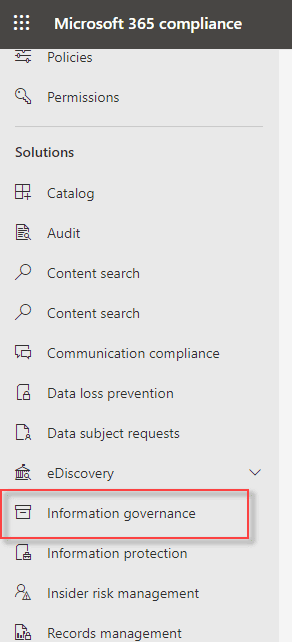
Step 2: On the left navigation menu select Information Governance
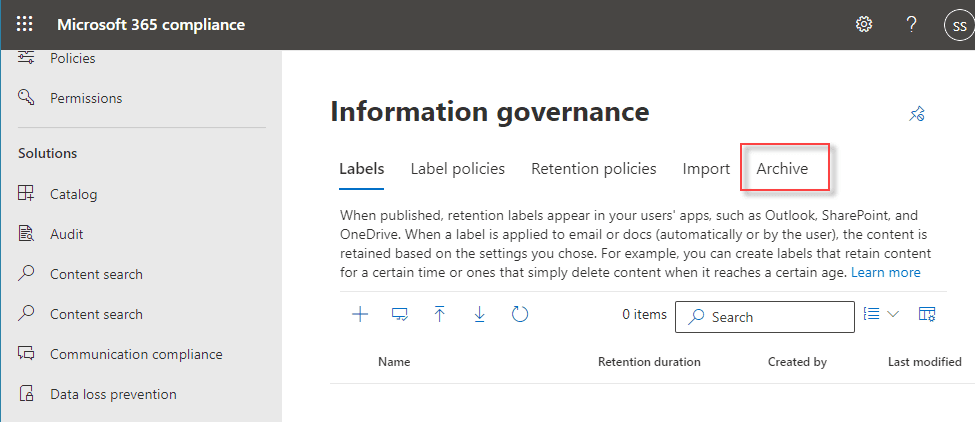
Step 3: Then click on the Archive tab
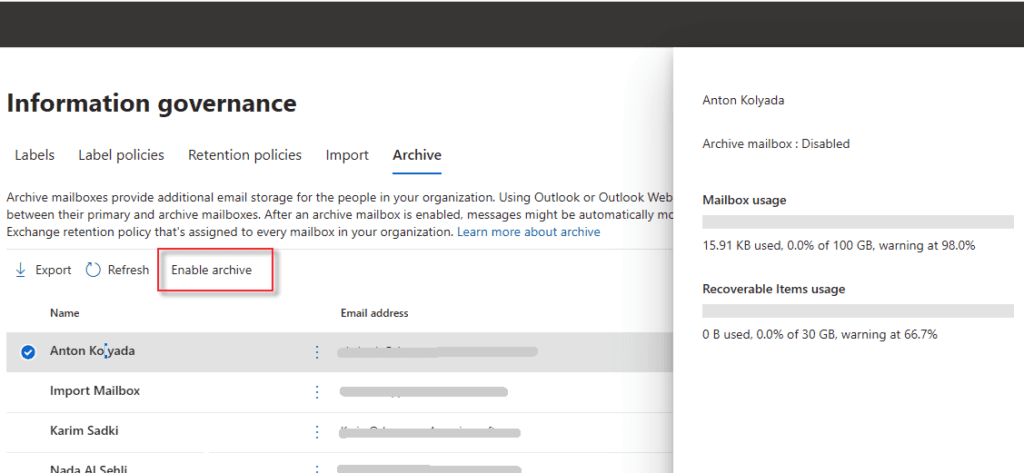
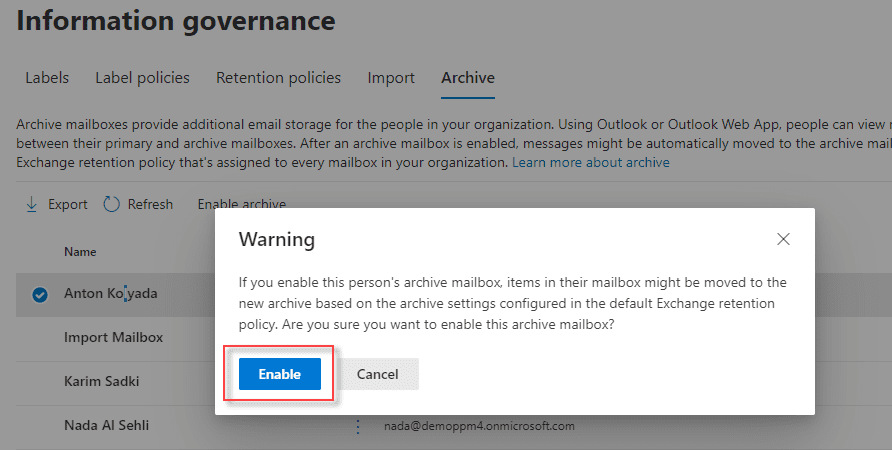
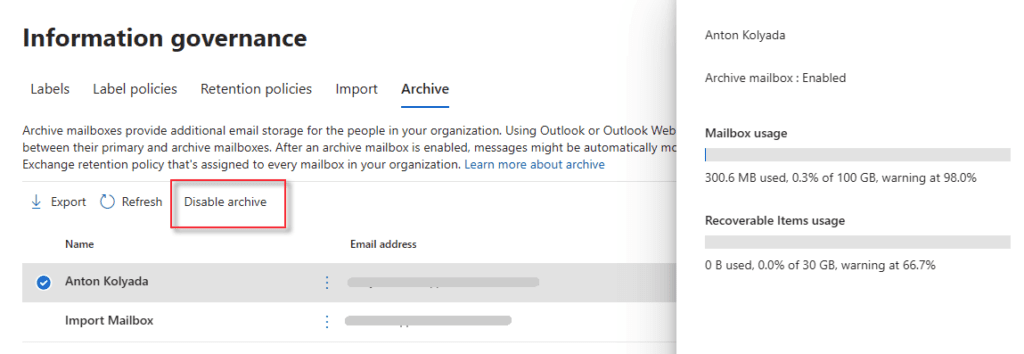
Step 4: Select the user on the table and click Enable archive on the control panel above the table. On the right side you can see the capacity and current usage of the mailbox of the selected user.
Step 5: Click “Enable” to archive the mailbox for the selected user
Step 6: You can confirm that Archive Mailbox is enabled
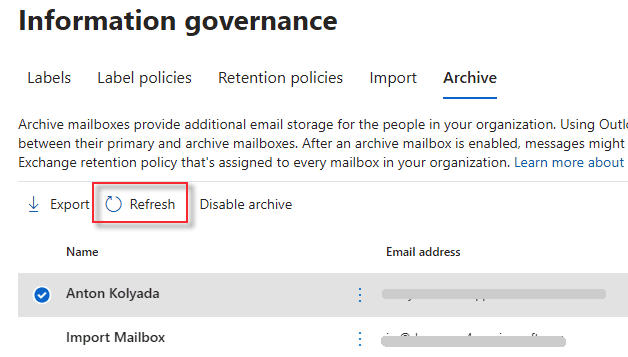
Step 7: If the status is still Disabled then just click Refresh
Step 8: Click Disable archive if you need to stop using the archive mailbox for the selected user
Step 8: Click Disable archive if you need to stop using the archive mailbox for the selected user.
Once you’ve accessed the Exchange admin center, take note of the Mailbox archive status toggle. By clicking this toggle, you deactivate the archive mailbox for the user. This step is crucial if you want to manage storage effectively without affecting the main mailbox contents.
Keep in mind, you have a 30-day window to reactivate the archive mailbox without losing any archived data. Should you miss this timeframe, unfortunately, the content will be permanently deleted, and recovery will not be possible. After 30 days, reactivating this feature will require setting up a new archive mailbox.
For your awareness, the default policy automatically moves items to archive mailboxes two years after their creation or delivery. This process helps in managing mailbox size efficiently while ensuring no disruption to the main mailbox.
Method 2: Enable Microsoft (Office) 365 Archive Mailbox Using Microsoft PowerShell
Why Use PowerShell?
Managing Office 365 accounts through PowerShell offers several advantages over the traditional graphical user interface (GUI), enhancing both productivity and efficiency.
1. Efficiency and Speed
PowerShell allows for the execution of multiple commands simultaneously, making it possible to perform bulk management tasks quickly. This is particularly useful when managing large volumes of user accounts or data.
2. Advanced Automation
With PowerShell scripts, repetitive tasks can be automated, significantly reducing the potential for human error. Automation also frees up time for IT professionals to focus on more strategic activities.
3. Comprehensive Control
PowerShell provides access to a wide array of features and settings not readily available in the GUI. This grants administrators more comprehensive control over their Office 365 environment and the ability to tweak advanced settings.
4. Real-Time Monitoring
Administrators can monitor storage usage and user activity in real-time with PowerShell. This allows for timely interventions and efficient resource management, ensuring optimal performance.
5. Scalability
As organizations grow, managing an increasing number of accounts through GUI becomes cumbersome. PowerShell excels in scalability, enabling seamless management regardless of the number of accounts.
Here are the steps to enable Microsoft (Office) 365 archive mailbox using Microsoft PowerShell
Step 1: Open the Start menu and type “powershell” to find the Windows PowerShell application and then select it to run
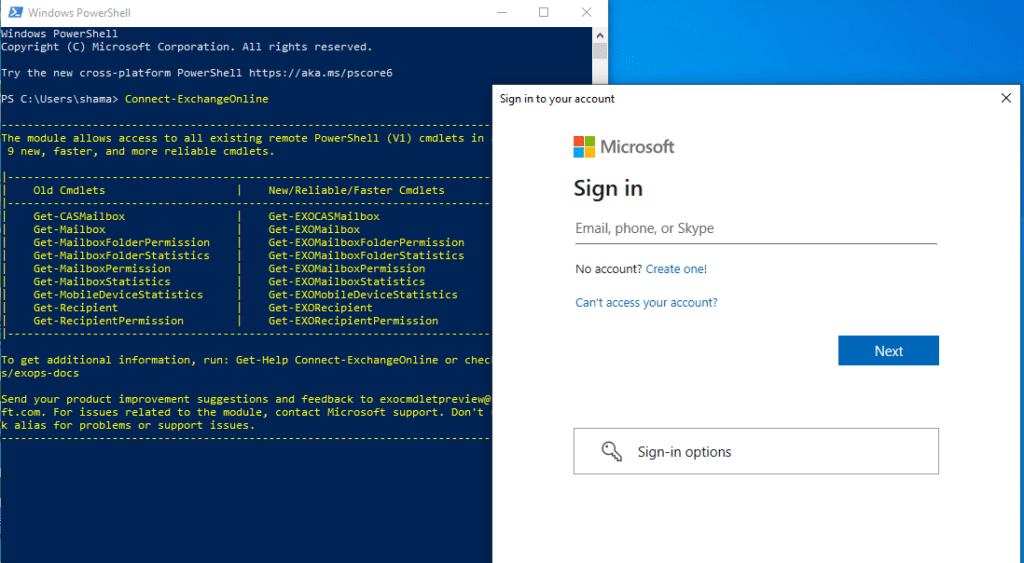
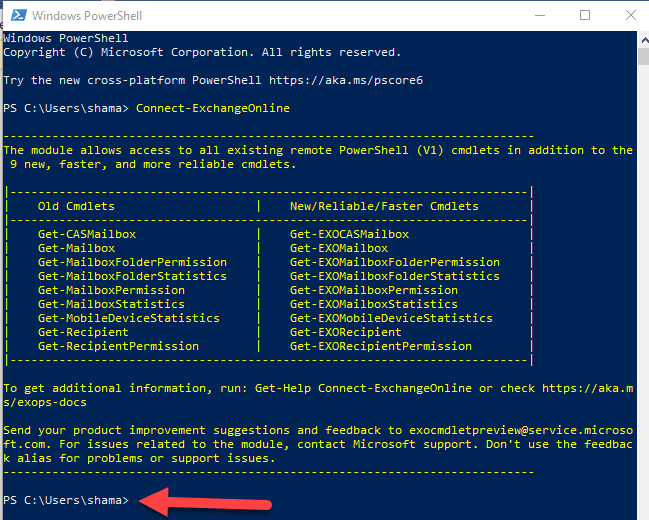
Step 2: Connect to Exchange Online PowerShell using the PowerShell Commandlet (cmdlet)
Connect-ExchangeOnlineThe Exchange Online module will load and the Sign-in window will open
Step 3: Type your user name (email) and password
Step 4: Once it is connected to your Office 365 tenant, you will see a new command line
Step 5: Insert the cmdlet to enable archiving the mailbox for the selected user
Where is the user’s display name
Enable-Mailbox -Identity -Archive
Step 6: To enable archive mailboxes for all users run the following cmdlet
Get-Mailbox -Filter {ArchiveGuid -Eq "00000000-0000-0000-0000-000000000000" -AND RecipientTypeDetails -Eq "UserMailbox"} | Enable-Mailbox -Archive
Step 7: To disable archive mailbox for a single user run the cmdlet
Where is the user’s display name
Disable-Mailbox -Identity -Archive
For example:
Disable-Mailbox -Identity "Nada Al Sehli" -Archive
Step 8: To disable archive mailboxes for all users run the cmdlet
Get-Mailbox -Filter {ArchiveGuid -Ne "00000000-0000-0000-0000-000000000000" -AND RecipientTypeDetails -Eq "UserMailbox"} | Disable-Mailbox -Archive
What Occurs If You Disable an Archive Mailbox and Exceed the 30-Day Reactivation Period?
When you initially disable an archive mailbox, you have a window of 30 days to reactivate it without losing any stored content. Within this period, all archived items remain secure and are fully recoverable.
However, if you surpass the 30-day threshold without reactivation, the situation changes dramatically. All archived content within the mailbox is permanently erased, with no options for recovery or restoration.
Should you decide to use an archive mailbox again after this period, you’ll need to begin anew by creating a fresh archive mailbox. It’s crucial to be aware of this time-sensitive process to avoid irreversible data loss.
Exploring the Pros and Cons of Office 365 Email Archiving
Email archiving in Office 365 offers a range of advantages for both individual users and businesses. However, it’s important to understand the potential drawbacks as well. Let’s dive deeper.
Benefits of Email Archiving
Improved Mailbox Management
- By archiving older emails, users can keep their active mailboxes clutter-free. This organization not only boosts email system performance but also simplifies searching for specific messages without wading through irrelevant ones.
Enhanced Compliance
- Archiving emails can ensure adherence to industry regulations. With added storage specifically for archived emails, there’s less risk of accidental deletion, thus supporting data retention policies effectively.
Automatic Storage Expansion
- Office 365 can automatically extend an archive mailbox’s storage when it reaches its limit. This eliminates the need for manual interventions, saving time and reducing the burden on IT teams.
Potential Drawbacks
- Complexity in Data Management
- Enabling archive mailboxes can introduce complications in the overall data management process. IT teams may face challenges managing a more intricate system but, with expertise, can use tools like PowerShell for efficient oversight and maintenance.
While email archiving provides a structured and compliance-friendly way to handle emails, it requires knowledgeable administration to maintain efficiency in a complex data environment.
Method 3: Backup Outlook Emails With Point-in-Time Recovery
Prefer an easier way? Simply backup your Exchange using CloudAlly Microsoft 365 Backup. It backs up all Microsoft 365 Exchange emails, calendars, contacts, and tasks in minutes. And our Outlook compatible .pst export means that your Office 365 data is still available even if MS Azure is temporarily unavailable.
Protect all your Microsoft Office 365 data from loss with top-rated, automated, and secure backup and recovery in minutes
Start a FREE 14-day full-feature trial – Exchange Online Backup
NO Credit Card | 5-Min Setup (honest!) | Unlimited AWS Storage

