

Microsoft Office 365 Backup and Recovery Options
- #1 Deleted Items Folder
- #2 eDiscovery
- #3 Microsoft (Office) 365 Archival
- #4 Microsoft (Office) 365 Retention Policy
- #5 Third-party Microsoft (Office) 365 Backup Tools
- Limitations of Native Microsoft (Office) 365 Backup Options
#1 Deleted Items Folder: The Primary Microsoft Office 365 Recovery Tool
The first place to recover Microsoft 365 data? The Deleted Items or Trash folder.
1. In your Outlook App, go to the Deleted Items or Trash folder
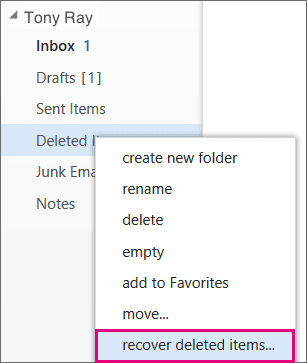
2. Right-click the item you want to recover
3. Select Move > Inbox to restore the file.
#2 eDiscovery: Office 365 Recovery Options
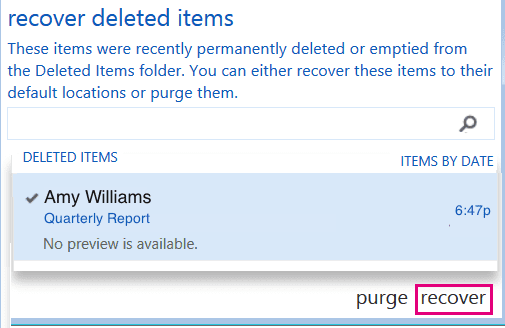
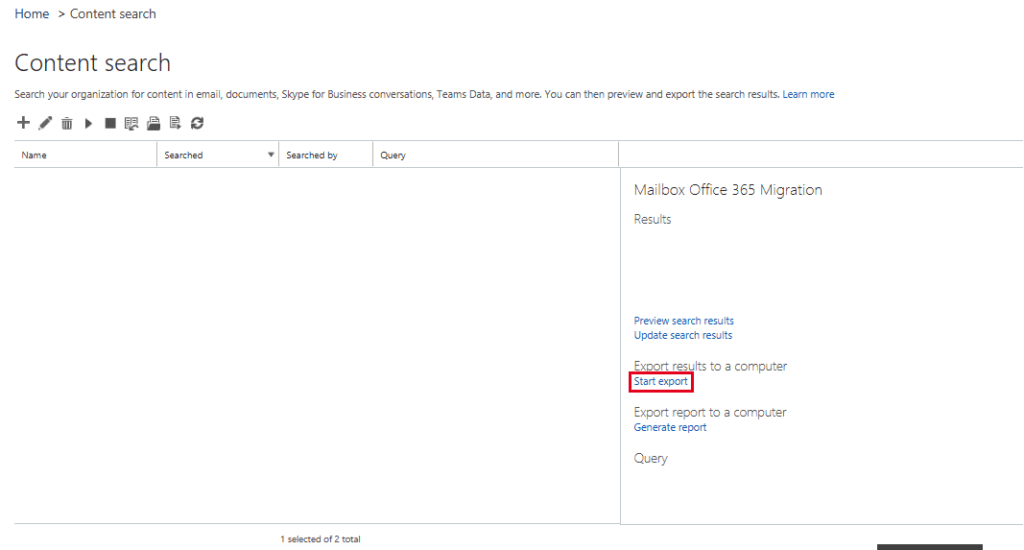
As far as native Office 365 recovery options go, you can harness eDiscovery for Litigation Hold items. The data can be downloaded in the PST format. Log in to your M365 account and go to the Exchange Admin Center. Note that you have to be part of the eDiscovery Manager role group.
Use the Content Search eDiscovery tool to search and find emails from mailboxes or public folders of Exchange Online. On locating the mailbox export this data to PST files.
#3 Microsoft Office 365 Archival: Microsoft Office 365 Backup Tools
Method 1: Enable Microsoft 365 Archival Via The Compliance Center
Watch the video here for step-wise instructions to setup archiving of Microsoft 365 data using the Compliance Center

Method 2: Enable Microsoft 365 Archival Using PowerShell
Prefer PowerShell? Here are the instructions and PowerShell commands
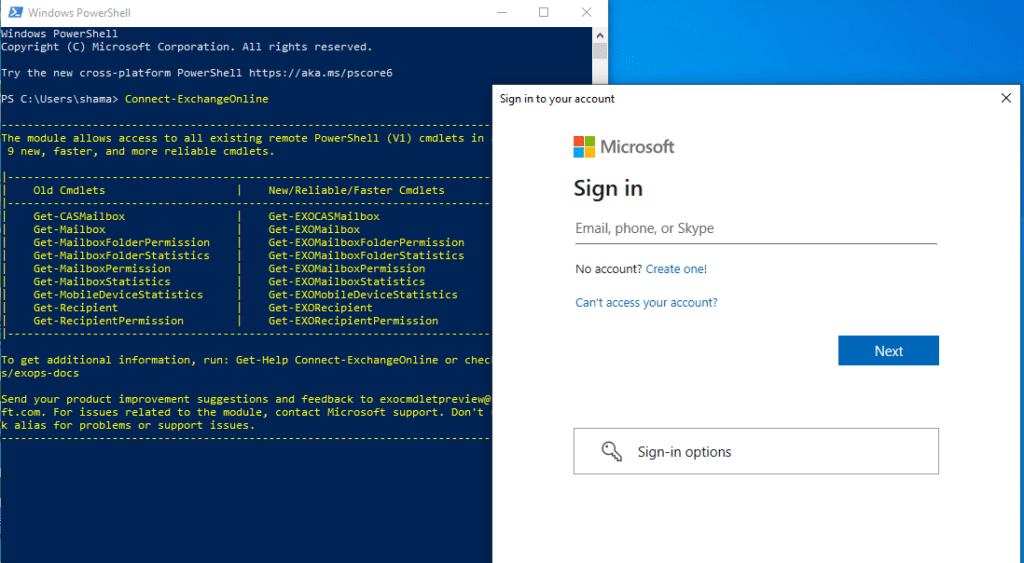
Connect to Exchange Online PowerShell using the PowerShell Commandlet (cmdlet)
Connect-ExchangeOnline
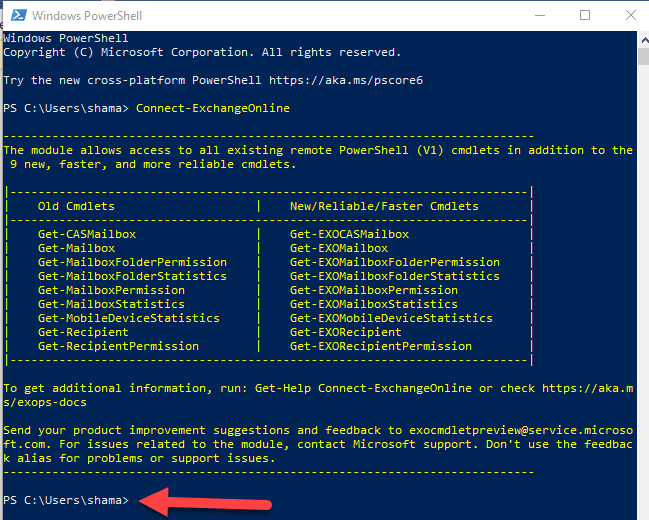
The Exchange Online module will load and the Sign-in window will open
Once it is connected to your Office 365 tenant, you will see a new command line
Step 5: Insert the cmdlet to enable archiving the mailbox for the selected user
Where <> is the user’s display name
Enable-Mailbox -Identity <> -Archive

Step 6: To enable archive mailboxes for all users run the following cmdlet
Get-Mailbox -Filter {ArchiveGuid -Eq "00000000-0000-0000-0000-000000000000" -AND RecipientTypeDetails -Eq "UserMailbox"} | Enable-Mailbox -ArchiveStep 7: To disable archive mailbox for a single user run the cmdlet
Disable-Mailbox -Identity <> -Archive

Where <> is the user’s display name
For example:
Disable-Mailbox -Identity "Nada Al Sehli" -Archive
Step 8: To disable archive mailboxes for all users run the cmdlet
Get-Mailbox -Filter {ArchiveGuid -Ne "00000000-0000-0000-0000-000000000000" -AND RecipientTypeDetails -Eq "UserMailbox"} | Disable-Mailbox -Archive#4 Setup a Retention Policy: Microsoft Office 365 Backup and Recovery Tools
Method 1: Setup Microsoft 365 Retention Label and Policy Via The Compliance Center

Method 2: Setup Microsoft 365 Retention Label and Policy using PowerShell
Create a Retention Label using Powershell
Connect to the Security and Compliance Center
Connect-IPPSSession

You will get a message that the “Security & Compliance Center” module is loading

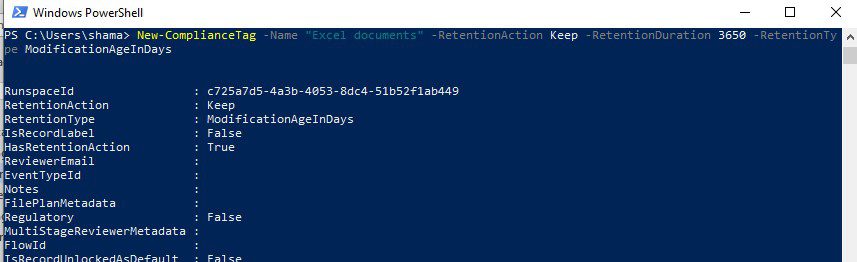
Run the script to create a label
New-ComplianceTag -Name "Excel documents" -RetentionAction Keep -RetentionDuration 3650 -RetentionType ModificationAgeInDays
Where:
Name: the name of the label
RetentionAction – what to do for the label. We will keep it in our case.
RetentionType – specify the start of the retention period. We will start the period since the object was last modified ModificationAgeInDays
RetentionDuration – The duration to retain items (10 years or 3650 days in our example)
Create a Retention Policy using Powershell
Connect to the Security and Compliance Center
Connect-IPPSSession

You will get a message that the “Security & Compliance Center” module is loading

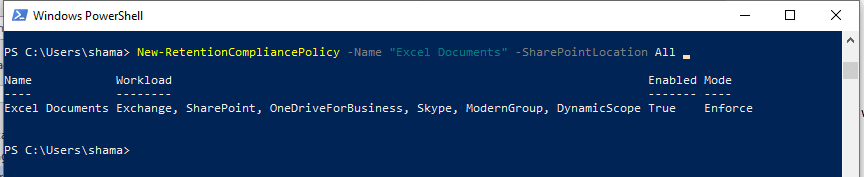
Step 4: Run the script to create a retention policy
New-RetentionCompliancePolicy -Name "Excel Documents" -SharePointLocation All
Parameters:
Name – The name of the retention policy. If the name includes a space symbol then the string should be included in quotation marks, like “Excel Files”
SharePointLocation – URL of SharePoint sites where Excel files should be retained. “All” means retain items from all sites.
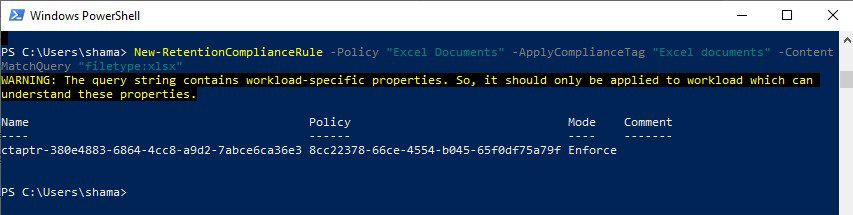
Step 5: Run the script to create a rule to retain Excel files for the policy created above:
New-RetentionComplianceRule -Policy "Excel Documents" -ApplyComplianceTag "Excel documents" -ContentMatchQuery “filetype:xlsx”
Parameters:
Policy – The name of the policy created in the previous step
ContentMatchQuery – The rule or query that will be used to filter items to be retained. For more information on using keywords, please refer to Microsoft’s Keyword Query Language (KQL) syntax reference
ApplyComplianceTag – The name of the retention label created above
#5 Third-party Microsoft Office 365 Backup Tools
There are many limitations on the time, accuracy, and reliability of native Microsoft 365 archival and recovery tools. Read this blog for a comparison of the native Microsoft Office 365 backup and recovery policy tools with third party backup. So much so that Microsoft itself recommends third-party backup, as do top analysts Gartner and Forrester
We strive to keep the Services up and running; however, all online services suffer occasional disruptions and outages, and Microsoft is not liable for any disruption or loss you may suffer as a result. In the event of an outage, you may not be able to retrieve Your Content or Data that you’ve stored. We recommend that you regularly backup Your Content and Data that you store on the Services or store using Third-Party Apps and Services.
Microsoft SLA
Backup helps with improving the Recovery time objective (RTO) and, consequently, your disaster recovery capabilities and business continuity. Limiting the damaging cost of downtime can significantly blunt the impact of a data breach (Calculate the cost with our Downtime Calculator). With CloudAlly Backup for Microsoft 365, you can recover data with one click. Watch how easy it is to back up and recover Microsoft 365 account data.
Limitations of Native Microsoft Office 365 Backup and Recovery Options
While the four options listed above can help with one-off retrieval of data, they can in no way substitute third-party Office 365 backup and recovery tools. Below are some of the limitations of these native Microsoft Office 365 backup and recovery options.
- If no retention policy is set, you can only recover items in the past 30 days (Deleted Items) + 14 days (Recoverable Items).
- eDiscovery archives are manual, hold outdated data, and work only to restore entire mailboxes.
- Insider threats are the biggest contributors to cyberattacks. Legal hold can be mistakenly or maliciously turned off and retention periods can be manipulated.
- Recovery with Litigation Hold is tedious with no support for easy granular search or cross-user restore. The folder structure is not preserved.
- For Exchange, calendar items are not retained, as are site looks/themes and related settings
- For SharePoint/One Drive, membership permissions, sharing, and access permissions are not preserved.
- For Teams/Groups, while chats are retained, chat attachments and Groups data not linked to SharePoint are not retained. No permissions, user membership, and metadata are secured with retention policies.
- The storage costs of retention can be significant crossing the 11TB limit of Microsoft 365. The costs can rack up especially if you are planning to use the Retention policies as backup – for a period of 3 years. That will require you to purchase additional storage even while incurring license upgrade costs to the most expensive Enterprise plan.
- Essentially, recovery is cumbersome with outdated data, thus defeating the very purpose of backup for quick recovery of lost data.
Migrating from on-premises Office 365 to cloud-based Microsoft 365 massively improves collaboration mechanisms, flexibility, and processing power. However, as per Microsoft’s shared responsibility model, the onus of data protection lies with you. Protect all your Microsoft 365 data – Mail, Calendar, Contacts, Tasks, Groups, Teams, OneDrive, SharePoint, and Public Folders – with one proven solution.